2016年12月18日 星期日

AngularJS中使用$http的POST不要傳送JSON格式給JSP, Servlet的方法

AngularJS 在用$http的angularjs service傳POST時,參數預設會用JSON的格式傳至url指定的後台,例如如果用以下的傳送方式:
$http({
   method: 'POST',
   url: 'xxx.do',
   data: {param1: "param1", param2: "param2"}
  })

後台例如Servlet會得到一串JSON格式的文字,像是 {'param1':'param1, 'param2' : 'param2},
但通常這並不是我們想要的key-value的型式,如果想要傳遞key-value型式的話,必須要用到
$httpParamSerializer這個angularjs service,並且設定header (不設定的話預設的Content-Type是application/json;charset=utf-8),使用方法如下:

$http({
   method: 'POST',
   url: 'xxx.do',
   data: $httpParamSerializer({param1: "param1", param2: "param2"}),
   headers: {
       'Content-Type': 'application/x-www-form-urlencoded'
   }
  })


這樣AngularJS就會以param1=param1&param2=param2的方式傳至後台了。

2016年12月12日 星期一

JQuery Ajax傳遞陣列時參數名不要帶中括弧的方法

JQuery的Ajax如果使用POST的話,似乎在1.4+版本後都會把陣列的參數名加上中括弧,例如以下:
$.ajax({
 method: "POST",
 url: "/xxx.do",
 data: {
    arrayParameter : ['1','2','3','4','5']         
 }
});

預設arrayParameter會以arrayParameter[]的參數名,值為1,2,3,4,5的方式傳進url指定的後台,例如果用Servlet去接的話就要用
String[] arrayParameter = request.getParameterValues("arrayParameter[]");
才能接到。
為了能夠讓JQuery傳的陣列參數不要帶上中括弧,必須指定ajax的traditional為true,例如:

$.ajax({
 traditional: true,
 method: "POST",
 url: "/xxx.do",
 data: {
    arrayParameter : ['1','2','3','4','5']         
 }
});

或是設定全局設定,讓每個ajax都能使用traditional的參數傳遞方式:
$.ajaxSetup({traditional: true});

參考資料:

  1. How do I remove the square brackets at the end of a JS variable name during AJAX calls?

2016年12月11日 星期日

Angular 簡易安裝使用 - Eclipse + Typescript plugin + System.js

Angular 的配置比起它的前一代AngularJs來說,稍微麻煩一點,因為涉及了typescript和module的使用。

在這裡我要介紹在Eclipse的開發環境中,以一個簡單的Angular 範列來說明如何簡單的在Eclipse中設置Angular 的初始設置。Typescript使用了Eclipse的typescript外掛、module使用了System.js。


需準備的步驟如下:

  1. node.js因為等下會使用到npm (Angular CLI),並且Eclipse的Typescript也需要用到node.js的功能,所以我們要先安裝node.js。
    node.js官網
  2. git for windows
    因為Angular CLI會需要用到git,所以需安裝windows版本的git。
    windows版本下載
  3. Angular CLI (選用)
    一個對於建置Angular 專案非常方便的工具,不過這裡為了要學習自己建置,所以只利用了Angular CLI來取得Angular 所需的modules,取得modules不一定要用Angular CLI,所以為選用。
    Angular CLI官方網站
  4. system.js
    這裡我們使用了system.js來使用javascript module,但也可選擇其他的module工具,例如webpack

取得Angular 所需的modules
我們可以利用node.js的npm來安裝Angular 所需的modules (會放到node_modules資料夾中),
但這裡我們也可以利用Angular CLI來簡單取得modules,
安裝好Angular CLI後,可以在命令列視窗中使用
ng new XXX
來在當下資料夾中建立Angular專案,在建立好的專案資料中,可以
找到Angular 所需的modules已經都下載後放在node_modules資料夾中

Eclipse (這裡安裝的是neon版本) + Typescript plugin
Help --> Install New Software...
--> 加入一個連結 : http://eclipse-update.palantir.com/eclipse-typescript/
下載安裝Eclipse的Typescript plugin

建立我們的專案
以下是我們的檔案結構圖

其中紅色框裡的是我們會建立的,藍框則是Typescript plugin幫我們編譯產生的。
在這裡Typescript plugin不是也不需使用如tsconfig.json的設定檔,而是直接在Eclpse裡設定,
對著專案按右鍵,選擇 Properties --> Typescript 可以看到如下畫面,其中
Source folder(s): ts檔放置的位置
Exported folder(s): 在 import module時,預設的路徑位置,例如node_modules之下的import路徑不用再打node_modules,預設會先重這裡找
Output folder: ts編譯成的js檔要放置的位置
接著設定 Compiler,這邊可以位照下面的設定就好,紅色框是比較重要的設定
再來就可以開始製作Angular 的範例了。

/index.jsp:
<%@ page language="java" contentType="text/html; charset=BIG5" pageEncoding="BIG5"%>
<!DOCTYPE html PUBLIC "-//W3C//DTD HTML 4.01 Transitional//EN" "http://www.w3.org/TR/html4/loose.dtd">
<html>
<head>
<meta http-equiv="Content-Type" content="text/html; charset=BIG5">
<title>Insert title here</title>

<script src="node_modules/core-js/client/shim.js"></script>
<script src="node_modules/reflect-metadata/Reflect.js"></script>
<script src="node_modules/zone.js/dist/zone.js"></script>
<script src="app/js/system.js"></script>
<script>
 System.config({
  defaultJSExtensions: true,
  paths: {
   'app/*': './app/*',
   '@angular/*': './node_modules/@angular/*',
   'rxjs/*': './node_modules/rxjs/*'
  },
  packageConfigPaths: ['./node_modules/@angular/*/package.json']
 });
 SystemJS.import('app/js/index.js');
</script>
</head>
<body>
 <my-app>Loading...</my-app>
</body>
</html>
其中Angular所需的shim.js、Reflect.js、zone.js雖然有被放在node_modules中,但因為它們並沒有寫成modules的型式,所以要直接用<script>來載入。
在這邊我們使用了system.js來載入module,System.config()設置了module的載入設定,以下說明:
defaultJSExtension: 如果為ture,則import module時可以不用寫副檔名,預設為js
paths:規定了module查找路徑,需注意的是在這裡除了使用了@angular之下的module,還有rxjs之下的module。
packageConfigPaths:預設先去尋找指定路徑資料夾內的package.json設定檔,如果找到了main屬性,以main指定的js檔案為要import的module

設定完後,用SytemJS.import()來載入此頁要用的,一開始的js程式。

/ts/index.ts:
import { platformBrowserDynamic } from '@angular/platform-browser-dynamic';
import { AppModule } from './app.module';
const platform = platformBrowserDynamic();
platform.bootstrapModule(AppModule);

/ts/app.module.ts:
import { NgModule }      from '@angular/core';
import { BrowserModule } from '@angular/platform-browser';
import { AppComponent }   from './app.component';
@NgModule({
  imports:      [ BrowserModule ],
  declarations: [ AppComponent ],
  bootstrap:    [ AppComponent ]
})
export class AppModule { }

/ts/app.component.ts
import { Component } from '@angular/core';
@Component({
  selector: 'my-app',
  template: '<h1>My First Angular2!!! App</h1>'
})
export class AppComponent { }


最後啟動Server,瀏覽index.jsp,應該就可以看到頁面一開始有Loading...字樣,然後很快變成My First Angular2!!! App的字的效果了
原始碼下載:

2016年11月28日 星期一

如何在Java上使用 pngquant png壓縮工具 (JNI)

pngquant是一個不錯的png圖檔縮工具,但它是用C語言寫成的,如果要用Java來使用它的話,就必需使用JNI (Iava Native Interface)的方式來調用C的程式,剛好工作上需要在Java的環境上使用它,特別在這紀錄下要使用pngquant的JNI流程。

pngquant的官網上有提供圖形化GUI的工具及命令列的Command-Line工具,如果要用程式碼的使用方式的話,可以點 "a library" 連結到它的 lib 網站 (libimagequant),在lib網站中,可以看到許多不同語言的使用方式。

我的環境是Windows 7,jdk1.5.0_15,必須製作相應libimagequant專案的dll檔。
制作dll檔有許多方式,libimagequant官網給Windows的建議為使用Viusal Studio或MinGW工具來產生dll,我選擇最簡單的方式,去Microsoft官網下載安裝Visual Studio 2015來用。

點擊 "MSVC-compatible branch of the library" 可連到MSVC版lib的Git網站,把整個專案下載下來後,就可以開始進行JNI的步驟。

以下是JNI的詳細步驟:

  1. 使用命令列視窗(cmd)到下載並已被解壓縮的libimagequant-msvc資料夾,打上以下指令來產生相應PngQuant.class、Image.class、 Result.class (Class檔請自行compile產生)的 標頭檔 (副檔名為h)
    javah org.pngquant.PngQuant
    javah org.pngquant.Image
    javah org.pngquant.Result
    產生出來的檔名會被多加一些前綴,把它們都刪掉,再把得到的pngQuant.h、Image.h、Result.h丟到org/pngquant的目錄下。
  2. 開啟Visual Studio 2015,New 一個 Win32 Project,Application type選 DLL ,Additional options選Empty Project就好。
  3. 先把org/pngquant/PngQuant.c丟到org外面那層(因為要配合裡面寫的include的path路徑),在Solution Explorer的Source File中,將全部檔(包括org資料夾之下)都Add進去(有些其實用不到,不過沒關係都先丟進去)
  4. 這時看PngQuant.h可能會發現有被畫紅線的Error,對專案安右鍵選擇"Properties" --> Configuration --> C/C++  設定 Additional Include Directories ,請設定jdk中include和include/win32的位置,例如以下路徑:
    C:\Program Files (x86)\Java\jdk1.5.0_15\include
    C:\Program Files (x86)\Java\jdk1.5.0_15\include\win32
    然後將專案的mode從debug改成release
  5. 開啟Eclipse,建立一個測試專案,將org/pngquant下的java檔全部丟到專案中,並且再將Visual Studio release出來的dll檔丟進去。
    撰寫一個測試的程式,例如叫做libimagequantTest.java,內容如下:
    import java.awt.image.BufferedImage;
    import java.io.File;
    import java.io.IOException;
    
    import javax.imageio.ImageIO;
    
    import org.pngquant.PngQuant;
    
    public class libimagequantTest {
    
     public static void main(String[] args) {
       BufferedImage newImg;
       
       PngQuant pngQuant = new PngQuant();
       
       try {
        newImg = pngQuant.getRemapped(ImageIO.read(new File("D:\\old_picture.png")));
        ImageIO.write(newImg, "png", new File("D:\\new_picture.png"));
       } catch (IOException e) {
        // TODO Auto-generated catch block
        e.printStackTrace();
       }
       
       pngQuant.close();
     }
    
    }
    
    最後的檔案結構會像這樣
  6. 在專案上按右鍵選擇Properties --> Java Build Path 設定 Nativ Library Location,例如此例我設定的是
    libimagequant_Test/src/org/pngquant
  7. 最後放上一張檔案大小較大的圖 D:\\old_picture.png,執行libimagequantTest.java,如果有出現另一張圖D:\\new_picture.png,就代表大功告成了。
源始碼下載:
pngquant JNI_Test.7z

2016年11月27日 星期日

Ardulink - Arduino的Java控制方案

Ardulink是一個開源Arduino的Java解決方案,提供了使用Java來控制Arduino的方法,讓Java操作Arduino版子變的更簡單,其源裡是先再Arduino上寫入程式,用來監聽從序列阜(Serial Port)上傳來的指令並做相應的操作、也用序列阜傳回相應的回應,序列阜的連接方式用到了之前文章"用Java與Arduino的序列阜溝通(使用RXTX)"講到的RXTX,而Java就用包好的API來對Arduino送指令。

要使用Ardulink,可以先到Ardulink的下載頁下載,會得到一個壓縮檔,找個位置解壓縮後就可以開始進行Ardulink的Java範例,LED閃光(BlinkLED),下面講解詳細步驟:
  1. 下載Ardulink並解壓縮以後,可以看到如下的檔案結構。
    我們會需要用到的有"winDLLs"及"lib"資料夾。
    打開winDLLs,可以看到32bit和64bit兩個資料夾,依自已需求選擇打開資料夾後可以再看到三個檔案:LibusbJava.dll、RXTXcomm.jar、rxtxSerial.dll
    LibusbJava.dll及rxtxSerial.dll是Java使用JNI要用的檔案。
    RXTXcomm.jar是Java要引入lib的其中一個檔案。
    lib資料夾裡的檔案是要給Java要引入的lib。
    而在bin資料夾裡面,放了兩個bat檔,其內容就只是幫忙把LibusbJava.dll、RXTXcomm.jar、rxtxSerial.dll放到lib資料夾而已。
    為了之後方便且起,在這裡我也把LibusbJava.dll、RXTXcomm.jar、rxtxSerial.dll通通放到lib資料夾。
  2. 接著是Arduino這端,我們必需要先再Arduino版子上寫入Serial Port溝通相關的程式,打開sketches資料夾,可以看到許多角本,這邊選擇ArdulinkProtocol裡的ArdulinkProtocol.ino執行就好,當然如果有相應的版子也可以選擇相應的角本,例如Digispark可以選擇ArdulinkProtocol4Digispark。
    需要注意的是,也為不同型號的版子有些許不同,例如Arduino Due目前沒支援tone()和noTone()這兩個函式,所以要稍微修改角本,因為我使用的是Arduino Due,為了簡單測試方便,就先把用到tone()和noTone()的指令先注解掉。
  3. 再來是Java這端,這裡以Eclipse Neon IDE及jdk1.8.0_05為例,檔案結構如下,
    BlinkLED是我們的主程式,用來控制Arduino的LED燈開闗(第13號PIN),先把剛剛lib資料夾裡的jar檔及RXTXcomm.jar引入library中。
    接著設定專案的Native library location,路徑為LibusbJava.dll、rxtxSerial.dll所在的路徑。
    BlinkLED.java的內容如下(參考https://github.com/Ardulink/Ardulink-2),作用為一秒亮、一秒暗Arduino板子的LED燈(Pin 13)。
    import java.io.IOException;
    import java.util.concurrent.TimeUnit;
    
    import org.ardulink.core.Link;
    import org.ardulink.core.Pin;
    import org.ardulink.core.Pin.DigitalPin;
    import org.ardulink.core.convenience.Links;
    
    public class BlinkLED {
    
     public static void main(String[] args) {
          Link link = Links.getDefault();
             DigitalPin pin = Pin.digitalPin(13);  //這裡13 pin是板子的LED燈
             boolean power = true;
             while (true) {
                 System.out.println("Send power:" + power);
                 try {
                  //swicthDigitalPin()為數位輸出,對應了Arduino的digitalWrite()
         link.switchDigitalPin(pin, power);  
         power = !power;
                  TimeUnit.SECONDS.sleep(1);  //1秒亮、1秒暗
        } catch (IOException | InterruptedException e) {
         // TODO Auto-generated catch block
         e.printStackTrace();
        }             
             }
     }
    }
    
  4. 執行BlinkLED.java後,應該就可以看到Arduino板子上的LED燈一亮一暗了。
    執行時可能會有下警告訊息,主要是RXTX版本及SLF4J Class衝突等警告,不過並不會影響程式運行,所以可暫且忽略。
    Stable Library
    =========================================
    Native lib Version = RXTX-2.2-20081207 Cloudhopper Build rxtx.cloudhopper.net
    Java lib Version   = RXTX-2.1-7
    WARNING:  RXTX Version mismatch
     Jar version = RXTX-2.1-7
     native lib Version = RXTX-2.2-20081207 Cloudhopper Build rxtx.cloudhopper.net
    SLF4J: Class path contains multiple SLF4J bindings.
    SLF4J: Found binding in [jar:file:/C:/Users/Administrator/Downloads/ardulink/lib/slf4j-jdk14-1.7.12.jar!/org/slf4j/impl/StaticLoggerBinder.class]
    SLF4J: Found binding in [jar:file:/C:/Users/Administrator/Downloads/ardulink/lib/slf4j-log4j12-1.7.5.jar!/org/slf4j/impl/StaticLoggerBinder.class]
    SLF4J: See http://www.slf4j.org/codes.html#multiple_bindings for an explanation.
    SLF4J: Actual binding is of type [org.slf4j.impl.JDK14LoggerFactory]


附注:
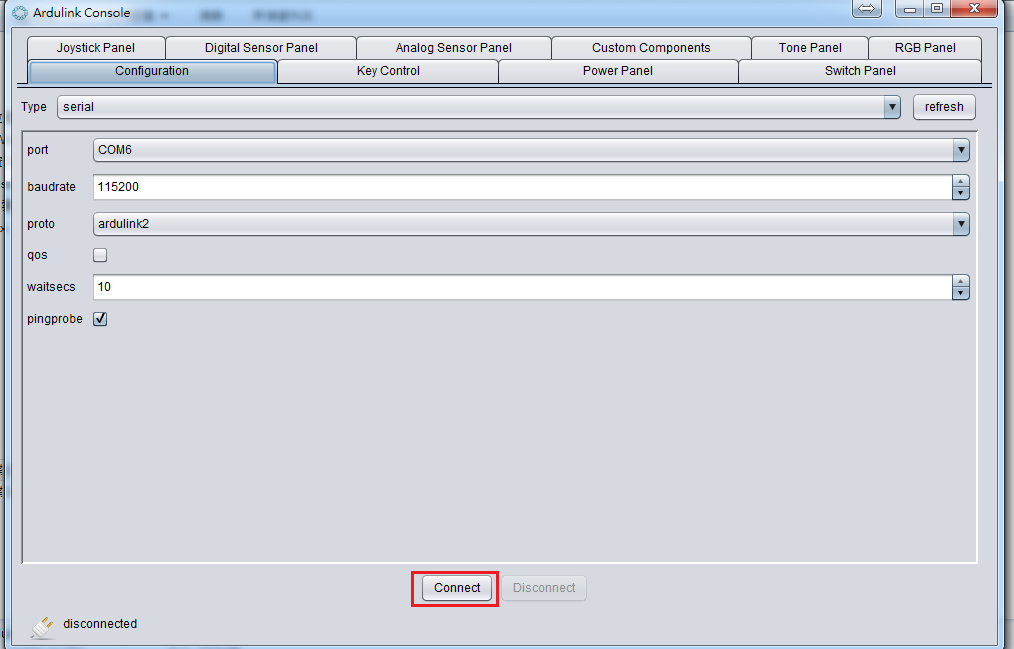
Ardulink有做一個UI介面可以跟Arduino板子作連接並控制(ardulink-console-2.0.1.jar),放在下載下來的 lib/ardulink-console-2.0.1.jar,在執行set32bitWindowsRXTX.bat或set64bitWindowsRXTX.bat(或自己手動把LibusbJava.dll、RXTXcomm.jar、rxtxSerial.dll丟到lib資料下)後,可以直接開啟ardulink-console-2.0.1.jar,看到如下視窗介面,按下Connect與Arduino連接後,在許多功能可以使用,對於想要測一下Arduino,還不想花太多時間寫程式時是個不錯的工具。

2016年10月2日 星期日

JForum advanced search照日期排序的bug

JForum的Search的功能似乎有些bug,在search時如果選擇以date來做排序的話,會不管選正排還是逆排,結果都是沒有照date來排序,事實上它總是以(id)主鍵來排序的,應該算是一個bug。

經過追蹤程式碼及上網搜尋相關資料後,找到了bug的產生原因,特別在這邊做個紀錄並提供一個個人的解決方法。

bug發生原因:
JForum使用了Lucene來實做文章(Post)檢索搜尋功能,Lucene的實做是沒有問題的,在search時選擇以date來做ASC及DESC排序時,Lucene的確是返回正確排序的post_id列表,但是JForum在用它自己寫的Sql語法去找對應這些post_id的Post detail詳細資料時,使用了IN [post_id]的寫法,造成了找出Post detail後,排序又變成以主鍵排序的順序了。

我們先來看一下出問題的地方,首先是
GenericLuceneDAO.java的getPostData(int[] postIds)方法,輸入參數postIds是Lucene返回的以正確排序的post_id,但在要取得對應的Post detail時,使用了SearchModel.getPostsDataForLucene這個Sql語法,這個語法寫在generic_queries.sql,內容為

SearchModel.getPostsDataForLucene = SELECT p.post_id, p.forum_id, p.topic_id, p.user_id, u.username, p.enable_bbcode, p.enable_smilies, p.post_time, pt.post_subject, pt.post_text, t.topic_title \
 FROM jforum_posts p, jforum_posts_text pt, jforum_users u, jforum_topics t \
 WHERE p.post_id IN (:posts:) \
 AND p.post_id = pt.post_id  \
 AND p.topic_id = t.topic_id \
 AND p.user_id = u.user_Id


可以看到在Sql語法中用了 p.post_id IN (:posts:) 這樣的語句( :posts: 字串會被替換掉),所以不管post_ids怎麼排序,Sql語法回傳的結果還是照著主鍵排。

我的解法是修改GenericLuceneDAO.java的getPostsData()方法,在Sql語法查完post detail後,再將它照著postIds的順序重新丟到一個新的ArrayList回傳,這樣這個方法回傳的結果就可以被修正成正確的了。

原本有bug的程式
public List getPostsData(int[] postIds)
 {
  if (postIds.length == 0) {
   return new ArrayList();
  }
  
  List l = new ArrayList();
  
  PreparedStatement p = null;
  ResultSet rs = null;
  
  try {
   String sql = SystemGlobals.getSql("SearchModel.getPostsDataForLucene");
   sql = sql.replaceAll(":posts:", this.buildInClause(postIds));
   
   p = JForumExecutionContext.getConnection().prepareStatement(sql);
   rs = p.executeQuery();
   
   while (rs.next()) {
    Post post = this.makePost(rs);
    post.setPostUsername(rs.getString("username"));
    
    l.add(post);
   }
  }
  catch (SQLException e) {
   throw new DatabaseException(e);
  }
  finally {
   DbUtils.close(rs, p);
  }
  
  return l;
 }


修正後的程式
public List getPostsData(int[] postIds)
 {
  if (postIds.length == 0) {
   return new ArrayList();
  }
  
  List l = new ArrayList();
  Post[] posts_orderByLucene = new Post[postIds.length];
  
  PreparedStatement p = null;
  ResultSet rs = null;
  
  try {
   String sql = SystemGlobals.getSql("SearchModel.getPostsDataForLucene");
   sql = sql.replaceAll(":posts:", this.buildInClause(postIds));
   
   p = JForumExecutionContext.getConnection().prepareStatement(sql);
   rs = p.executeQuery();
   
   while (rs.next()) {
    Post post = this.makePost(rs);
    post.setPostUsername(rs.getString("username"));
    
    for (int i = 0; i< postIds.length ; i++){
     if (postIds[i] == post.getId()){
      posts_orderByLucene[i] = post;
      break;
     }
    }    
   }
   l = Arrays.asList(posts_orderByLucene);
  }
  catch (SQLException e) {
   throw new DatabaseException(e);
  }
  finally {
   DbUtils.close(rs, p);
  }
  
  return l;
 }


參考資料:

  1. JForum 搜索时按时间排序的问题解决
  2. Bug for searching with descending order

Google Chrome Web Push (客製化訊息 - 需加密)

Google Chrome Web Push是Google的一項服務,可以讓管理者向User主動推播訊息,
跟之前介紹的對Android GCM推播很像(如何向GCM Server傳送資料如何接收GCM Server發送的Registration ID訊息,以php、Java及JSP為例,以php、Java及JSP為例),事實上Google Chrome Web Push目前也是利用GCM服務來實現的。

Google Chrome Web Push可以寫死彈跳訊息的code在client端(註冊時會記錄),也可以動態訊息給client,不過因為安全的問題,必須使用Google規定的方式來加密訊息。

在這邊就來一步步展示如何做一個簡單的Google Chrome Web Push實現: