2019年7月18日 星期四

Typescript + Webpack (使用 ts-loader ) 練習

在"Typescript + Webpack (or SystemJs) 練習"這篇文章中,使用了多次指令分別去:
1. 用 npm 去 install 要的工具
2. 用 tsc 去使用 typescript 編譯
3. 用 webpack 去使用 webpack 打包程式

這次要來紀錄只使用 npm 指令,
因為 npm 的 package.json 可以設定 script 來方便的執行 command line 的指令,
而 webpack 可以用各種 loader 來處理項任務,其中 ts-loader 可以處理 typescript 的任務,
所以我們可以讓npm 去呼叫 webpack ,webpack 去呼叫 typescript 去完成任務。

這次的檔案結構跟上次差不多,如下所示:

其中,js 資料夾裡的檔案是 webpack 搭配 ts-loader 編擇 src資料夾下檔案所產生出來的,
package-lock.json不用管它,因為是npm 自已產生的。

我們先看看 Greeter.ts 和 test.ts :
Greeter.ts :
export class Greeter{
    name : string;
    constructor(name :string){
        this.name = name;
    }
    greet(){
        console.log("Hello, HIHI, " + this.name);
        alert("Hello, HIHI, " + this.name);
    }
}

test.ts :
import {Greeter} from "./Greeter";
 
let name : string = "Hugo";
let greeter : Greeter = new Greeter(name);
greeter.greet();

可以注意的是,在 test.ts 中 import 的Greeter可以只有檔名而沒有副檔名,因為在webpack.config.js中,有設定resolve {extensions : ['.js', '.ts']} 的設定。
接著我們來看看 npm的package.json、tyscript的tsconfig.json和webpack的webpack.config.js
三個 config 檔的內容:


package.json :
{
  "name": "webpacktypescripttest",
  "scripts": {
    "devEnvBuild": "npm install --save-dev typescript ts-loader webpack webpack-cli",
    "deploy": "webpack"
  },
  "devDependencies": {
    "ts-loader": "^6.0.4",
    "typescript": "^3.5.3",
    "webpack": "^4.36.1",
    "webpack-cli": "^3.3.6"
  }
}

tsconfig.json :
{
  "compilerOptions": {
    "target": "es5",
    "module": "commonjs",
    "sourceMap": true,
    // "outDir": "./dist", //不需要
    "strict": true,
    "esModuleInterop": true    
  }
}

webpack.config.js :
var path = require('path');
module.exports = {
    entry: "./src/test.ts",
    output: {
        path: __dirname + "/js",
        filename: "test.js"
    },
    watch: false,
    devtool : 'source-map',
    mode : "production",
    resolve : {
     extensions : ['.js', '.ts']
    },
    module: {
     rules: [
       { 
        test: /\.ts$/, 
        use: 'ts-loader',
        include: path.resolve(__dirname, 'src')
       }
     ]
 }
}

可以注意到,在 tsconfig.json 中,我們不需要寫 outDir 來指定 typescript 的輸出位置,
其實就算指定了,經過 webpack 用 ts-loader 來執行 typescript 時,
也不會在 outDir 指的地方出現輸出的檔案。

先假設整個環境除了 npm 以外都沒建置完成,即 webpack, typescript, ts-loader.... 等
先用 command line 視窗到 webpackTypescriptTest 資料夾的路徑,
執行指令:
npm run devEnvBuild
就可以執行已經寫在 package.json 中,script 裡,devEnvBuild的指令,等同於執行
npm install --save-dev typescript ts-loader webpack webpack-cli
接著再執行
npm run deploy
就可以發現在 js 資料夾中,檔案被產生出來了,其中已經包括了 typescript的編擇和 webpack 的打包
可以注意到的是,在 webpack.config.js 中 ,
我們用了 module 設定了 ts-loader 來為 ts 檔在打包前進行了 typescript 的編譯。

最後我們在 index.html 中就可以使用 src/test.js 了 :

index.html :

 <head>
  <script src="js/test.js"></script>
 </head>
 <body> 
 </body>
</html>

原始碼下載:
webpackTypescriptTest.7z

參考資料:
  1.  TypeScript | webpack
  2. TYPESCRIPT合成WEBPACK中

2019年6月4日 星期二

取得Youtube及Vimeo影片的縮圖


Youtube:
各種尺寸解析度的縮圖API (XXX為影片ID):
https://img.youtube.com/vi/XXX/0.jpg
https://img.youtube.com/vi/XXX/1.jpg
https://img.youtube.com/vi/XXX/2.jpg
https://img.youtube.com/vi/XXX/3.jpg
https://img.youtube.com/vi/XXX/default.jpg
https://img.youtube.com/vi/XXX/hqdefault.jpg
https://img.youtube.com/vi/XXX/mqdefault.jpg
https://img.youtube.com/vi/XXX/sddefault.jpg
https://img.youtube.com/vi/XXX/maxresdefault.jpg

回應都為縮圖的網址
--------------------------------------------------------------------------------------------------

Vimeo:
API為 (XXX為影片ID)
http://vimeo.com/api/v2/video/XXX.json

例如:
http://vimeo.com/api/v2/video/336638047.json
回應為

{
    "id": 336638047,
    "title": "Machine Learning",
    "description": "Commissioned piece <br />\nDirector's cut<br />\n<br />\nStarring Thi-Mai Nguyen<br />\n<br />\n<br />\n<br />\nDir: Luke White<br />\nProd: Lauren Tyson<br />\nDOP: Giuseppe Favale<br />\nEditor: Brendan Jenkins<br />\nSound & Music: Mutant Jukebox<br />\nPost: FreeFolk<br />\nArt Dir: James Hamilton",
    "url": "https://vimeo.com/336638047",
    "upload_date": "2019-05-16 13:33:33",
    "thumbnail_small": "http://i.vimeocdn.com/video/783713149_100x75.jpg",
    "thumbnail_medium": "http://i.vimeocdn.com/video/783713149_200x150.jpg",
    "thumbnail_large": "http://i.vimeocdn.com/video/783713149_640.jpg",
    "user_id": 581986,
    "user_name": "Luke White",
    "user_url": "https://vimeo.com/lukewhite",
    "user_portrait_small": "http://i.vimeocdn.com/portrait/31879108_30x30",
    "user_portrait_medium": "http://i.vimeocdn.com/portrait/31879108_75x75",
    "user_portrait_large": "http://i.vimeocdn.com/portrait/31879108_100x100",
    "user_portrait_huge": "http://i.vimeocdn.com/portrait/31879108_300x300",
    "stats_number_of_likes": 403,
    "stats_number_of_plays": 8057,
    "stats_number_of_comments": 20,
    "duration": 110,
    "width": 1920,
    "height": 1080,
    "tags": "dance, ai, robot, artificial intelligence, choreography, experiment, machine learning, mountain, TSO, elbows, technology, computer, limits, dead, falling, woman, playing",
    "embed_privacy": "anywhere"
}

其中的
thumbnail_small
thumbnail_medium
thumbnail_large
就是不同尺寸大小的縮圖網址

參考資料:

  1. How do I get a YouTube video thumbnail from the YouTube API?
  2. Get img thumbnails from Vimeo?

2019年6月3日 星期一

Javascript Canvas - 物理球碰撞 (含重力加速度)

Javascript Canvas - 物理球碰撞 (含重力加速度) 的分享
其中用到了二維非彈性碰撞物理公式
假設每個球的質量都一樣,
設置了牆壁和球的恢復係數 (coefficient of restitution) ,
在空白處按滑鼠可以產生出一個新的球

https://jsfiddle.net/hugogo7646/ep4x608d/


html:
<canvas></canvas>
==================
CSS:
canvas {
  display: block;
  width: 100%;
  height: 100%;
  border: 1px solid blue;
}
==================
Javascript:
//Class definition - Start
function Ball(x, y) {
  this.x = x;
  this.y = y;
  this.r = 10;
  this.vx = 0; //Math.random(10);
  this.vy = 0; //Math.random(10);
  this.ax = 0;
  this.ay = g;
  this.color_R = Math.round(Math.random() * 255);
  this.color_G = Math.round(Math.random() * 255);
  this.color_B = Math.round(Math.random() * 255);
}
Ball.prototype = {
  draw: function() {
    this.vx += this.ax;
    this.vy += this.ay;     
    this.x += this.vx;
    this.y += this.vy;

//if ball hit with border
    if (isTopWallCollision(this)) {
    this.y = this.r;
    this.vy *= -1 * restitutionCoefficient_of_border
    }
    if (isBottomWallCollision(this)) {
    this.y = canvas.height - this.r;
    this.vy *= -1 * restitutionCoefficient_of_border
    }
    if (isLeftWallCollision(this)) {
    this.x = this.r;
    this.vx *= -1 * restitutionCoefficient_of_border
    }
    if (isRightWallCollision(this)) {
    this.x = canvas.width - this.r;
    this.vx *= -1 * restitutionCoefficient_of_border
    }
 
    context.beginPath();
    context.arc(this.x, this.y, this.r, 0, Math.PI * 2, false);
    context.fillStyle = 'rgba(' + this.color_R + ', ' + this.color_G + ', ' + this.color_B + ', 1)';
    context.fill()
  }
}
//Class definition - End

//Config - Start //
var ballCount = 30;
var ballList = [];
var g = 0.1;
var restitutionCoefficient_of_border = 0.9;
var restitutionCoefficient_of_ball = 0.9;
//Config - End //

var canvas = document.querySelectorAll("canvas")[0];
var context = canvas.getContext("2d");

//Create balls
for (var i = 0; i < ballCount; i++) {
  var isNewBallCollision = false;
  var newBall;
  do {
    newBall = new Ball(Math.random() * canvas.width, Math.random() * canvas.height);
    isNewBallCollision = isWallCollision(newBall);
    if (isNewBallCollision){
    continue;
    }
    for (var j = 0; j < ballList.length; j++) {
      isNewBallCollision = isBallCollision(ballList[j], newBall);
      if (isNewBallCollision) {
        break;
      }
    }
  } while (isNewBallCollision);

  ballList.push(newBall);
}

draw();

canvas.addEventListener('click', function(e) {
  var x = event.clientX;
  var y = event.clientY;
  var rect = this.getBoundingClientRect();
  //Recalculate mouse offsets to relative offsets
  x -= rect.left;
  y -= rect.top;
  //Also recalculate offsets of canvas is stretched
  //changes coordinates by ratio
  x *= this.width / this.clientWidth;
  y *= this.height / this.clientHeight;
  ballList.push(new Ball(x, y));
})

function draw() {
  context.clearRect(0, 0, canvas.width, canvas.height);

  for (var i = 0; i < ballList.length; i++) {
    ballList[i].draw();
    for (var j = i + 1; j < ballList.length; j++) {
      if (isBallCollision(ballList[i], ballList[j])) {
        ballCollision(ballList[i], ballList[j]);
      }
    }
  }
  requestAnimationFrame(draw);
}

function isBallCollision(ball1, ball2) {
  return Math.pow(ball1.x - ball2.x, 2) + Math.pow(ball1.y - ball2.y, 2) <= Math.pow(ball1.r + ball2.r, 2)
}
//Wall Collision functions - Start
function isWallCollision(ball) {
  return isTopWallCollision(ball) || isBottomWallCollision(ball) || isLeftWallCollision(ball) || isRightWallCollision(ball);
}

function isTopWallCollision(ball) {
  return (ball.y - ball.r) <= 0;
}

function isBottomWallCollision(ball) {
  return (ball.y + ball.r) >= canvas.height;
}

function isLeftWallCollision(ball) {
  return (ball.x - ball.r) <= 0;
}

function isRightWallCollision(ball) {
  return (ball.x + ball.r) >= canvas.width;
}
//Wall Collision functions - End

function ballCollision(ball1, ball2) {
  var clooisionVectorLength = Math.sqrt(Math.pow((ball1.x - ball2.x), 2) + Math.pow((ball1.y - ball2.y), 2));
  var collisionX = (ball1.x - ball2.x) / clooisionVectorLength;
  var collisionY = (ball1.y - ball2.y) / clooisionVectorLength;

  var collision_ball1_x = Math.pow(collisionX, 2) * ball1.vx + collisionX * collisionY * ball1.vy;
  var collision_ball1_y = collisionX * collisionY * ball1.vx + Math.pow(collisionY, 2) * ball1.vy;

  var collision_ball2_x = Math.pow(collisionX, 2) * ball2.vx + collisionX * collisionY * ball2.vy;
  var collision_ball2_y = collisionX * collisionY * ball2.vx + Math.pow(collisionY, 2) * ball2.vy;

  ball1.vx = collision_ball2_x + (ball1.vx - collision_ball1_x);
  ball1.vy = collision_ball2_y + (ball1.vy - collision_ball1_y);
  ball2.vx = collision_ball1_x + (ball2.vx - collision_ball2_x);
  ball2.vy = collision_ball1_y + (ball2.vy - collision_ball2_y);

  ball1.vx *= restitutionCoefficient_of_ball;
  ball1.vy *= restitutionCoefficient_of_ball;
  ball2.vx *= restitutionCoefficient_of_ball;
  ball2.vy *= restitutionCoefficient_of_ball;

  ball1.x += collisionX * (ball1.r + ball2.r - clooisionVectorLength);
  ball1.y += collisionY * (ball1.r + ball2.r - clooisionVectorLength);
  ball2.x += -1 * collisionX * (ball1.r + ball2.r - clooisionVectorLength);
  ball2.y += -1 * collisionY * (ball1.r + ball2.r - clooisionVectorLength);
}

正規表示法的 Positive/Negative Lookhead 和 Positive/Negative Lookbehind

Positive Lookhead :
a(?=b)
後面跟著 "b" 才match "a" ("b"不在match的結果裡)
例如:
可以match:ab, abc, bab
不會match:ac, ade, bad

Negative Lookhead :
a(?!b)
後面不跟著 "b" 才match "a" ("b"不在match的結果裡)
例如:
可以match:ac, ade, bad
不會match:ab, abc, bab


Positive Lookbehind:
(?<=a)b
前面跟著 "a" 才match "b" ("a"不在match的結果裡)
例如:
可以match:ab, abc, bab
不會match:xb, xbc, xbb


Negative Lookbehind:
(?<!a)b
前面不跟著 "a" 才match "b" ("a"不在match的結果裡)
例如:
可以match:xb, xbc, xbb
不會match:ab, abc, bab

應用範例:
找出單獨的 "a",不要match連續的 "a" (ex: aaa )
(?<!a)a(?!a)
解釋:
前面不跟著 "a", 才 match a(?!a),
後面不跟著 "a", 才 match a

Note:
以下網站不支援  Positive/Negative  Lookbehind
Regexper
DebuggexBeta

可以用 regular expressions 101 網站測試。
Javascript, Java 等程式語言也有支援  Positive/Negative  Lookbehind

參考資料:
  1. Lookahead and Lookbehind Zero-Length Assertions

2019年5月2日 星期四

Javascript - Canvas 文字粒子特效

今天要來演示如何利用Javascript的canvas來制作文字子特效,
成品效果就像下面這樣,只要在<input>裡面打字,下面的canvas就會出現相應的粒子特效:
其他別人做的更厲害的版本可以參考這裡:
Text particle

不過不管是簡單還是複雜酷炫的版本,其基本原理都相同,就是利用了
Javascript的canvas,繪制了文字之後,擷取繪制了文字的canvas各pixel顏色和透明度資訊 (RGBA),進行處理後再依我們想要的效果再次重繪。

下面就來進行說明:
  1. 建立畫布
    在頁面中建立一個<canvas>用來當做畫布
    <canvas width="500" hiehgt="500"></canvas>
  2. 取得canvas物件後先繪制文字(text)上去
    var canvas = document.querySelectorAll("canvas")[0];
    var context = canvas.getContext("2d");
    context.textAlign = "center";
    context.font = "100px arial";
    context.fillText(text, 200, 100);
  3. 取得canvas的RGBA資訊
     var imageData = context.getImageData(0, 0, canvas.width, canvas.height).data;
    其中data是一個類陣列物件,每四個一組分別代表canvas各pixel位置 Red, Green, Blue, Alpha 的值 (0~255),
    例如 {R1, G1, B1, A1, R2, G2, B2 ,A2, R3, G3, B3, A3, ..........}
    以此類推,pixel位置由canvas的由左至右,由上至下。
    有了RGBA資訊後,我們就能來進行自已想要的粒子化處理了
  4. 粒子化處理
    再處理前,先把canvas 清空
    context.clearRect(0, 0, canvas.width, canvas.height);
    接著對data取得每四組的RGBA值,其中我們不想拿取每個pixel的RGBA,
    只想取得間隔為5 pixel (sampleRate ) 的 RGBA資訊,
    並且檢查透明度 (Alpha),如果大於0的話,我們就用canvas繪制一個圓在相應的位置上。

    如此一來,就會呈現原來的文字被間隔取樣重繪成圓圈的子效果了。

    var sampleRate = 5;
      for (var j = 0; j < canvas.height; j += sampleRate) {
        for (var i = 0; i < canvas.width; i += sampleRate) {
          //Get RGBA data
          var red = imageData[(i + j * canvas.width) * 4];
          var green = imageData[(i + j * canvas.width) * 4 + 1];
          var blue = imageData[(i + j * canvas.width) * 4 + 2];
          var alpha = imageData[(i + j * canvas.width) * 4 + 3];
          if (alpha > 0) { //If alpha > 0, draw circle
            context.beginPath();
            //context.strokeStyle = "rgba(" + red + ", " + green + ", " + blue + ", " + alpha + ")";
            context.fillStyle = "rgba(" + red + ", " + green + ", " + blue + ", " + alpha + ")";
            context.arc(i, j, 2, 0, 2 * Math.PI);
            context.fill();
          }
        }
      }
下面是完整的程式碼 :
Html :
<div>Please insert text here to see partical special effect.</div>
<div><input type="text" /></div>
<div><canvas width="500" hiehgt="500"></canvas></div>

Javascript :
//Text to draw
var sampleText = "👚👕 H";
drawParticleText(sampleText);

document.querySelectorAll("input")[0].addEventListener("input", function(event) {
 drawParticleText( this.value ? this.value : sampleText);
});

function drawParticleText(text) {
  var x = 200;
  var y = 100;
  var canvas = document.querySelectorAll("canvas")[0];
  var context = canvas.getContext("2d");
  
  //clear canvas first
  context.clearRect(0, 0, canvas.width, canvas.height);
  
  //Draw text first
  context.textAlign = "center";
  context.font = "100px arial";
  context.fillText(text, 200, 100);
  //Get canvas data (RGB and alpha),
  //Data in imageData : [(r, g, b, a) of 1st place, (r, g, b, a) of 2nd place......]
  //from left to right, from top to bottom
  var imageData = context.getImageData(0, 0, canvas.width, canvas.height).data;
  //Clear drawing
  context.clearRect(0, 0, canvas.width, canvas.height);

  //Sampling rate
  var sampleRate = 5;
  for (var j = 0; j < canvas.height; j += sampleRate) {
    for (var i = 0; i < canvas.width; i += sampleRate) {
      //Get RGBA data
      var red = imageData[(i + j * canvas.width) * 4];
      var green = imageData[(i + j * canvas.width) * 4 + 1];
      var blue = imageData[(i + j * canvas.width) * 4 + 2];
      var alpha = imageData[(i + j * canvas.width) * 4 + 3];
      if (alpha > 0) { //If alpha > 0, draw circle
        context.beginPath();
        //context.strokeStyle = "rgba(" + red + ", " + green + ", " + blue + ", " + alpha + ")";
        context.fillStyle = "rgba(" + red + ", " + green + ", " + blue + ", " + alpha + ")";
        context.arc(i, j, 2, 0, 2 * Math.PI);
        context.fill();
      }
    }
  }
}

CSS (加框只是方便觀察):
canvas {
  border: 1px solid blue;
}

參考資料:

  1. 随便谈谈用canvas来实现文字图片粒子化
  2. 《每周一点canvas动画》—— 文字粒子
  3. Text particle

2018年9月16日 星期日

OpenCV - Java - 臉部辨識

OpenCV 是一個是一個跨平台的電腦視覺庫,其可讓我們方便的做許多圖像方面的處理,
在這裡我參考了網路上的資料加上修改實測,展示一個簡單的OpenCV範例:

程式語言 : Java
需求:
調用電腦本身的攝影機,在UI上顯示即時截取的畫面,並在辨視出人臉的地方加上方框,並將人臉部份儲存至本地電腦上。

這裡下載OpenCV,我下載的是 3.4.1 的Win pack版本,下載後執行,它會解壓縮生成一個opencv資料,打開它後,
會看到所須的jar檔及dll檔:
opencv-341.jar
並且在x64和x86資料夾內有不同位元的windows dll檔:
opencv_java341.dll

以Eclipse來示範,除了加入opencv0341.jar到lib後,還要如下圖設定Native library location為dll檔所在的資料夾路徑

接下來是程式的部份
import java.io.ByteArrayInputStream;
import java.io.FileInputStream;
import java.util.Calendar;
import java.util.concurrent.Executors;
import java.util.concurrent.ScheduledExecutorService;
import java.util.concurrent.TimeUnit;

import org.opencv.core.Core;
import org.opencv.core.Mat;
import org.opencv.core.MatOfByte;
import org.opencv.core.MatOfRect;
import org.opencv.core.Point;
import org.opencv.core.Rect;
import org.opencv.core.Scalar;
import org.opencv.imgcodecs.Imgcodecs;
import org.opencv.imgproc.Imgproc;
import org.opencv.objdetect.CascadeClassifier;
import org.opencv.videoio.VideoCapture;
import org.opencv.videoio.Videoio;

import javafx.application.Application;
import javafx.event.ActionEvent;
import javafx.event.EventHandler;
import javafx.geometry.Insets;
import javafx.geometry.Pos;
import javafx.scene.Scene;
import javafx.scene.control.Button;
import javafx.scene.image.Image;
import javafx.scene.image.ImageView;
import javafx.scene.layout.BorderPane;
import javafx.scene.layout.HBox;
import javafx.scene.layout.VBox;
import javafx.stage.Stage;

public class OpenCV_Test extends Application{

 //是否正在截取攝影機影像
    private boolean isStart = false;
 
    private VideoCapture videoCapture;
    private ScheduledExecutorService scheduledExecutorService;
 
    // JavaFX 元件
    private BorderPane rootNode;
    private VBox vbox;
    private ImageView imageView;
    private Button startStopBtn;
    String startText = "Start";
    String stopText = "Stop";
 
 public static void main(String[] args) {
  Application.launch(args);
 }

 @Override
 public void start(Stage primaryStage) throws Exception {
  
  startStopBtn.setOnAction(new EventHandler<ActionEvent>() {

   @Override
   public void handle(ActionEvent event) {
    if (!isStart) {
     startStopBtn.setText(stopText);
     videoCapture.open(0);
     videoCapture.set(Videoio.CAP_PROP_FRAME_WIDTH, 640);
     videoCapture.set(Videoio.CAP_PROP_FRAME_HEIGHT, 480);
     
     if (videoCapture.isOpened()) {
      isStart = true;
      
      //建立設定截取攝影機的thread
      scheduledExecutorService = Executors.newSingleThreadScheduledExecutor();
      scheduledExecutorService.scheduleAtFixedRate(new Runnable() {

       @Override
       public void run() {
        imageView.setImage(captureImage());
       }
       
      }, 0, 16, TimeUnit.MILLISECONDS);
     }else {
      System.err.println("Error: Can not open camera.");
     }
     
    }else {
     startStopBtn.setText(startText);
     isStart = false;
     
     scheduledExecutorService.shutdown();
     try {
      //確保scheduledExecutorService有正確關閉排程
      while(!scheduledExecutorService.awaitTermination(30, TimeUnit.MILLISECONDS)) {
       System.out.println("Not close thread yet");
      }
     } catch (InterruptedException e) {
      System.err.println(e.getMessage());
      e.printStackTrace();
     }
     
     videoCapture.release();
     imageView.setImage(null);
    }
   }
   
  });
  
  //UI畫面
  Scene scene = new Scene(rootNode, 800, 640);
        primaryStage.setTitle("OpenCV Test");
        primaryStage.setScene(scene);
        primaryStage.show();
 }

 //UI畫面設定
 @Override
 public void init() throws Exception {
  super.init();
  
  System.loadLibrary(Core.NATIVE_LIBRARY_NAME);
  videoCapture = new VideoCapture();
  
  rootNode = new BorderPane();
  
  vbox = new VBox();
  vbox.setAlignment(Pos.CENTER);
  rootNode.setCenter(vbox);
  
  imageView = new ImageView();
  imageView.setFitWidth(640);
  imageView.setFitHeight(480);
  imageView.setPreserveRatio(true);
  
  startStopBtn = new Button(startText);
  vbox.getChildren().addAll(imageView, startStopBtn);
  
 }

 //程式關閉時關閉攝影機
 @Override
 public void stop() throws Exception {
  if (videoCapture.isOpened()) {
   videoCapture.release();
  }
  super.stop();
 }
 
 private Image captureImage() {
  Image capturedImage = null;
 
  if (videoCapture.isOpened()) {
   Mat mat = new Mat();
   videoCapture.read(mat);
   if (!mat.empty()) {
    MatOfByte buffer = new MatOfByte();
    //偵測人臉,截取人臉部份存圖,
    //並在要顯示在畫面上的影像用矩形標示人臉部份
    detectDrawAndSaveFace(mat);
          Imgcodecs.imencode(".png", mat, buffer);
          capturedImage = new Image(new ByteArrayInputStream(buffer.toArray()));
   }
  }   
        return capturedImage;
 }
 
 //臉部偵測
    private void detectDrawAndSaveFace(Mat image) {
     CascadeClassifier faceDetector = new CascadeClassifier();
        faceDetector.load("D:\\JavaLib\\opencv\\sources\\data\\haarcascades_cuda\\haarcascade_frontalface_alt2.xml");

        MatOfRect faceDetections = new MatOfRect();
        faceDetector.detectMultiScale(image, faceDetections);
        for (Rect rect : faceDetections.toArray())
        {
         //截detect到人臉的區域,將區域內的圖存檔
            Mat faceImage = new Mat(image, rect);
            String outputDir = "D:\\detectedFaces";
            String outputFilePath = outputDir + "\\detectedFace_" + Calendar.getInstance().getTimeInMillis() + ".png";
            Imgcodecs.imwrite(outputFilePath, faceImage);
            
            //在detect到人臉的區域上畫上矩形邊框,顯示在螢幕上的ImageView上
            Imgproc.rectangle(image, new Point(rect.x, rect.y), new Point(rect.x + rect.width, rect.y + rect.height), new Scalar(0, 255, 0));
        } 
    }
}


Opencv 3.4.1 Win pack 下載分享

參考資料:
  1. Java+opencv3.2.0之人脸检测
  2. [OpenCV] 人臉偵測 (Face Detection)
  3. [OpenCV] 人臉偵測2 (Face Detection)
  4. 利用Java调用OpenCV进行人脸识别OpenCV on Raspberry Pi - Using Java(7)- 使用 OpenCV 截取與顯示影片

2018年9月8日 星期六

Java 圖片旋轉 (Java Image Rotate)

這次要紀錄的是用Java進行圖片旋轉,
我們希望在將圖片旋轉後,能得到能夠剛好容納旋轉後圖片的新片大小,
例如以下的例子,上面的是原圖,下面的是順時鏡旋轉了60度的圖片,
可以看得出來,在此例中,旋轉後的圖其寬高比原圖還要大,原因是為了要容納旋轉後的圖,新圖片的寬高須要重新計算的關係。

在看程式碼之前,我們需要計算旋轉後的新寬高,
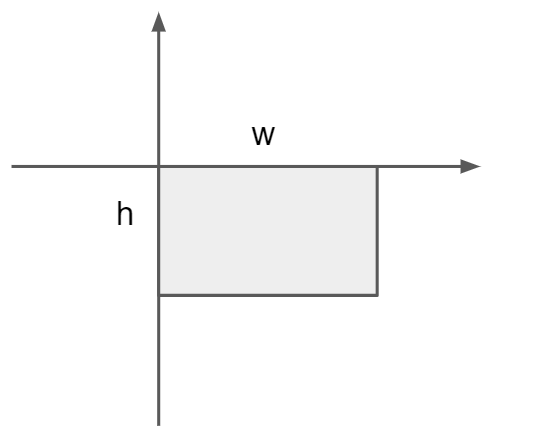
首先,例如有一個如下圖所示的,寬為w,高為h的圖片


下圖是旋轉了Θ角後的圖片,並附上了新寬(w')及新高(h')的推導

下圖也是旋轉了θ後的圖片,但是θ為負值,所以sin(θ) 為負值,

上面兩張圖只舉例了θ在-π/2 ~ π/2 的情況,但是在任何角度都是一樣的,都可以推出
w'= h |sin(θ)| + w |cos(θ)|
h' = h |cos(θ)| + w |sin(θ)|

因為Java繪圖會從左上角開始往右下繪圖的關係,在這邊我們稱繪圖區為畫布,
畫布的區域為座標原點右下區域的為置,即第四象限
有了新寬(w')高(h')了以後,我們還需要知道圖片被旋轉了以後,要如何平移才能將旋轉後的圖片放置到畫布中間。

旋轉且平移到畫布中的圖片應如下圖所示:


為了計算方便,我們採取以圖片中心點為旋轉中心的方式來推導,如下圖所示,
δh即δw為圖片以中心點旋轉後要平移的距離,可以看到推導後的結果為
δh = h'/2 - h/2
δw = w'/2 - w/2
經過了上述的推導後,我們得到了以下公式:
w'= h |sin(θ)| + w |cos(θ)|
h' = h |cos(θ)| + w |sin(θ)|
δh = h'/2 - h/2
δw = w'/2 - w/2

於是我們知道了旋轉圖片的程式邏輯:
1. 計算出新圖片的寬(w')高(h')
2.將圖片以中心點(w/2, h/2)為旋轉中心旋轉 θ
3.將圖片進行δw, δh 的平移使其位於第四象限的畫布中

最後,依照上述邏輯寫成的Java程式碼如下:
import java.awt.Graphics2D;
import java.awt.RenderingHints;
import java.awt.image.BufferedImage;
import java.io.File;
import java.io.IOException;
import javax.imageio.ImageIO;

public class ImageRotateTest {
 public static void main(String[] args) throws IOException {
  String inputFilePath = "D:\\inputImage.png";
  String outputFilePath = "D:\\outputRotatedImage.png";
  
  File inputImage = new File(inputFilePath);
  File outputImage = new File(outputFilePath);
  
  BufferedImage newBufferedImage = rotateImage(ImageIO.read(inputImage), 60);
  
  String outputImageExtension = outputFilePath.substring(outputFilePath.lastIndexOf(".") + 1);
  ImageIO.write(newBufferedImage, outputImageExtension, outputImage);
 }

 public static BufferedImage rotateImage(BufferedImage bufferedimage, int degree) {
  int w = bufferedimage.getWidth();
  int h = bufferedimage.getHeight();
  int type = bufferedimage.getColorModel().getTransparency();
  double radiusDegree = Math.toRadians(degree);

  double newH = Math.abs(h * Math.cos(radiusDegree)) + Math.abs(w * Math.sin(radiusDegree));
  double newW = Math.abs(h * Math.sin(radiusDegree)) + Math.abs(w * Math.cos(radiusDegree));

  double deltaX = (newW - w) / 2;
  double deltaY = (newH - h) / 2;
  
  BufferedImage img = new BufferedImage((int) newW, (int) newH, type);
  Graphics2D graphics2d = img.createGraphics();
  graphics2d.setRenderingHint(RenderingHints.KEY_INTERPOLATION, RenderingHints.VALUE_INTERPOLATION_BILINEAR);

  // 以下為矩陣相乘, [translate] * [rotate] * [image的x,y]
  // 所以行為為,先rotate,再translate
  graphics2d.translate(deltaX, deltaY);
  graphics2d.rotate(radiusDegree, w / 2, h / 2);  //以中心點旋轉
  graphics2d.drawImage(bufferedimage, 0, 0, null);

  graphics2d.dispose();

  return img;
 }
}


要注意的是Java進行圖形變換 (旋轉、平移、縮放等) 的方法矩陣變換,而連乘的矩陣是右邊的先做運算再輪到左邊,所先先旋轉再平移,在程式上的順序是
先寫 Graphics2D.translate() 再 Graphics2D.rotate()

原始碼下載:
ImageRotateTest.7z
旋轉圖片推導

參考資料:
  1. Black area using java 2D graphics rotation?
  2. 浅谈矩阵变换——Matrix
P.S. 
改使用ImageIcon的程式 (速度比較快)
ImageIcon imageIcon = new ImageIcon(fromSrc);
  File toImage = new File(toSrc);

        int w= imageIcon.getIconWidth();
        int h= imageIcon.getIconHeight();
        int imageType= BufferedImage.TYPE_INT_RGB;
        
        double radiusDegree = Math.toRadians(degree);
        //calculate new width/height of rotated image
        double newW = Math.abs(h * Math.sin(radiusDegree)) + Math.abs(w * Math.cos(radiusDegree));
        double newH = Math.abs(h * Math.cos(radiusDegree)) + Math.abs(w * Math.sin(radiusDegree));
        //calculate new width/height offset of rotated image
        double deltaX = (newW - w) / 2;
        double deltaY = (newH - h) / 2;
        
        BufferedImage img = new BufferedImage((int) newW, (int) newH, imageType);
        Graphics2D graphics2d= img.createGraphics();
        graphics2d.setRenderingHint(RenderingHints.KEY_INTERPOLATION, RenderingHints.VALUE_INTERPOLATION_BILINEAR);
        
        //Image Transoform Matrix : �A [translate] * [rotate] * [x,y of Image]
        //rotate --> translate
        graphics2d.translate(deltaX, deltaY);
        graphics2d.rotate(radiusDegree, w/2, h/2);
        
        graphics2d.drawImage(imageIcon.getImage(), 0, 0, null);
        graphics2d.dispose();
        
        String outputfileExtension = toSrc.substring(toSrc.lastIndexOf(".") + 1);
        ImageIO.write(img, outputfileExtension, toImage);